This website is made possible by readers. I may earn a small commission when you buy through the links in this article at no extra cost to you. Learn more.
Details
- Price $379.95 for the aluminum version at peakdesign.com
- Material Aluminum
- Weight 3.44 lbs / 1.56 kg
- Max load 20 lbs / 9.1 kg
Overview
While I've been writing on this site for many years now, I've managed to keep my camera equipment to the bare minimum. I have one camera, one lens, and two tripods. As much as I love to do without tripods, they are essential for me to take fit pics for the clothing I review.
The main reason I got another tripod was because my first one, the Sirui T2005X, has seen better days. I stepped on one of its legs during a trip to Taiwan and broke off the bottom extension. While it is usable, its stability is questionable at best, and yet I continued to use it. This lesson cost me about $700 to repair my lens when a gust of wind toppled it over. It fell down like the expression on my face.
I got a secondhand Manfrotto which was great but impossible to travel with due to its bulk and weight. The Travel Tripod was something I've been eyeing for quite some time. And my chance to review it is pure elation.
I've always enjoyed Peak Design bags, but frankly, I prefer other brands like Aer or Able Design. And there is a reason for that. Peak Design was founded in 2010 by Peter Dering from his garage on a simple idea—to create camera gear that seamlessly integrates into the lifestyles of photographers and adventurers.
Dering, himself an avid traveler and engineer, wanted to design products that not only prioritize functionality, but aesthetics. While they have backpacks for products, they are more a brand of photography gear than anything; which makes the Travel Tripod something quite special.
It’s essential to find a tripod that combines the right features, like being compact, tall enough, sturdy, easy to use, and lightweight. But often, these features clash with each other. Finding that right balance is pretty much an art.
From my review of the Peak Design Everyday Backpack Zip, I knew Peak Design is capable of high-quality products. But can the Travel Tripod fare well, while being travel-friendly? I’ll find out with the aluminum version I have in hand.
Style
When one buys a Peak Design product, you know they care about looks and are willing to pay a premium for it. I usually don't like to comment on packaging, since the product is what matters, but the Travel Tripod impressed me from the moment it was delivered.
Out of the immaculately designed packaging is the tripod in a gray bag. I don't quite like the texture of the bag, but the gray material is in line with PD's style.
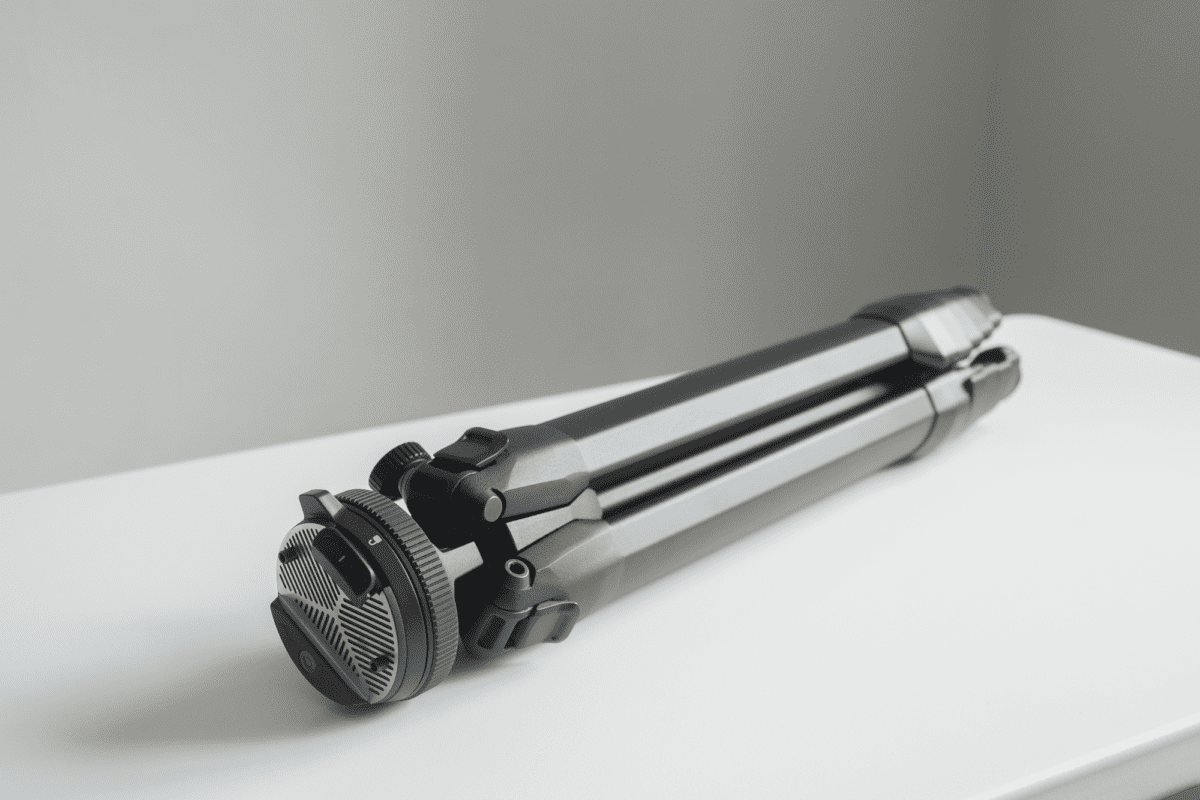
The tripod itself not only looks premium but also feels premium with a decent amount of weight. Even looking up close, you can see every detail handled well, such as the immaculate layout of the quick-release plate on top.
This used to be an ad.
But no one likes ads, so I got rid of them. If my articles helped you, I ask for your support so I can continue to provide unbiased reviews and recommendations. Every cent donated through Patreon will go into improving the quality of this site.
Material
The Peak Design Travel Tripod is available in two versions, distinguished primarily by materials— one version utilizes aluminum alloy for its legs, while the other is crafted from carbon fiber.
Aluminum alloy is known for its durability and affordability. It offers a decent strength-to-weight ratio, making it a popular choice for tripod legs. Although slightly heavier than carbon fiber, aluminum alloy tripods are generally more budget-friendly while still providing adequate stability and vibration absorption.
On the other hand, carbon fiber is prized for its exceptional strength and lightweight properties. It boasts a higher strength-to-weight ratio compared to aluminum, making carbon fiber tripods ideal for travelers and photographers who prioritize portability without compromising on stability, thanks to its superior vibration absorption properties resulting in sharper images, particularly in challenging shooting conditions.
Looking at actual numbers, the aluminum alloy model weighs 1.56 kg (3.44 lbs) while the carbon fiber version weighs 1.29 kg (2.81 lbs), with respective price tags of $380 and $650. This means paying an extra $270 for a weight reduction of 270 g, equating to a dollar per gram saved.
Both variants share identical specifications, including a collapsed height of 39.1 cm (15.4 inches), a maximum height of 152 cm (60 inches) with the center column raised, and 130 cm (51 inches) without it. Additionally, they boast the same load capacity of 9.1 kg (20 lbs), although it's worth noting that the standard of load capacity ratings can vary in the industry.
Which should you get? If you are a pro who wants the best you can get or just some chaebol, then carbon fiber is the obvious choice. For most, aluminum might be a more reasonable choice that will offer reliable performance.
Usage
Tripod case
The weatherproof case that comes with the tripod is padded yet compact. While it was relatively easy to take the tripod in and out, I did have difficulties zipping it up completely. The zipper that goes down halfway certainly does no favors here.
You have to pull the zip up strongly to create some space within the case on top and tuck any parts of the tripod into the case. It is slightly easier if you put it in the tripod head first.
I designed a thing.
I found a 100 year old company that would create these heirloom quality canisters for me. They are handmade and will keep your tea leaves, coffee beans or anything that you need dry for years to come.
or read review
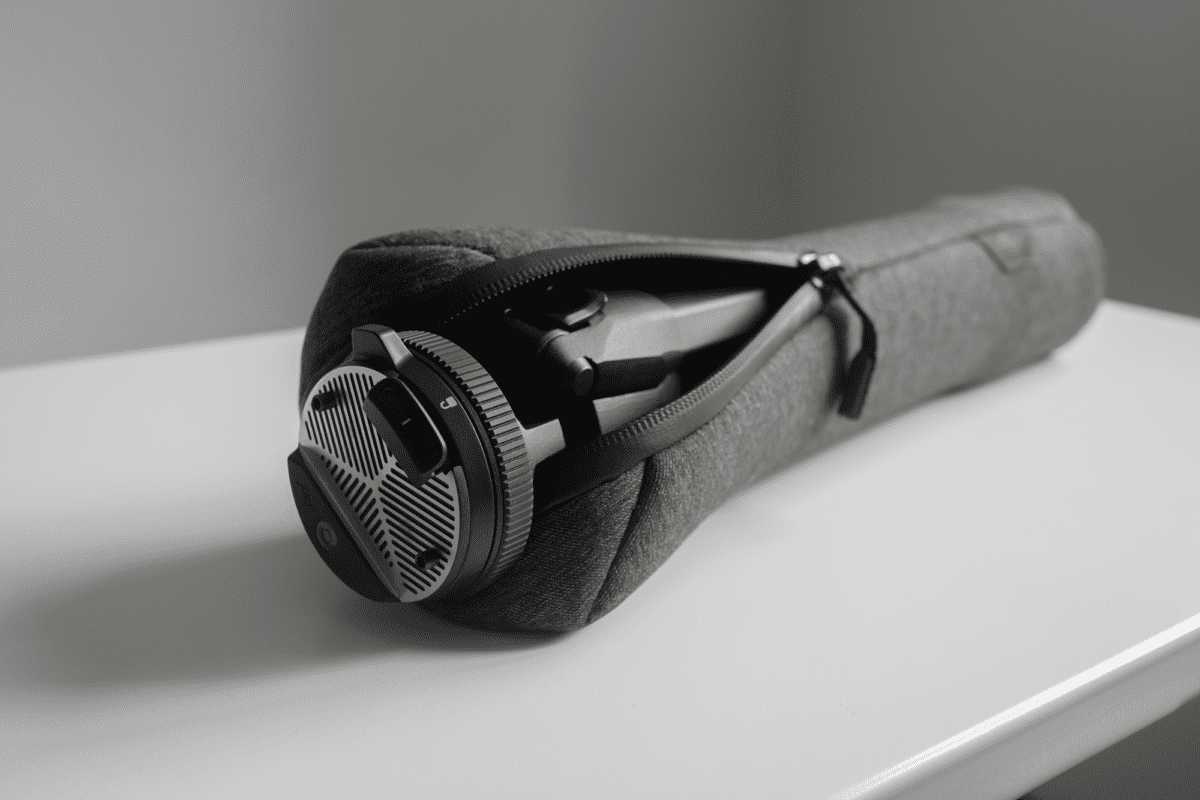
This sacrifice was made up for by the compact package that makes this a true travel tripod. You can easily slip it into external water bottle slots in backpacks.
There are also loops on each side of the case to make it easy to hang up the tripod when not in use, which is my default way of storing it.
Camera mounting and adjustment
Because four years of thought has been put into this product, the new ideas make it less intuitive but the usage was easy to pick up by watching Peak Design's walkthrough video.
The tripod comes with a standard plate that you attach to your camera. The included 4mm hex tool will help you tighten it to the camera. You can mount the plate just by inserting it front-end first and pushing it down till the clasp engages.

This clasp disengages with a simple push of a button. If you want to reduce camera shake, you can lock this clasp via a locking ring, with simple icons telling you the current state.
You can pull out a knob on the right and turn it to loosen or tighten the center column. You can do so even without pulling it out, but being able to pull it out is a nice touch that lets you turn it, unhindered by the legs.
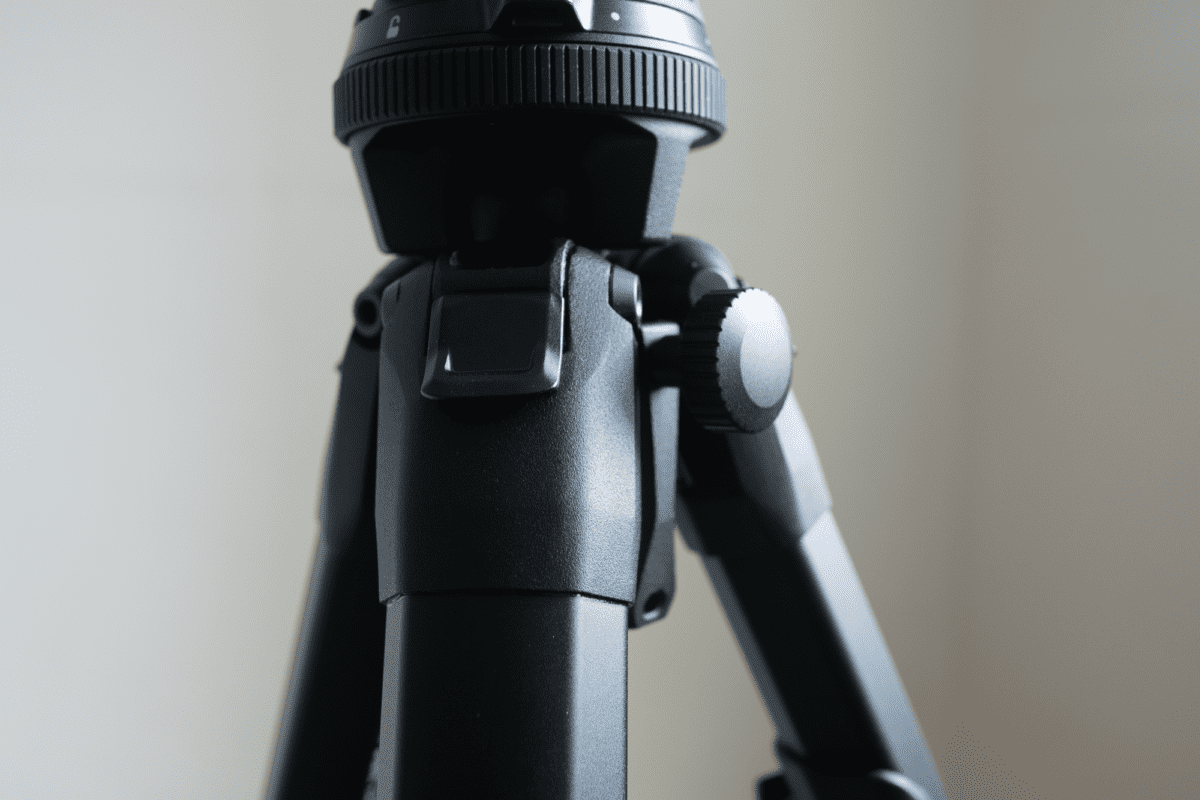
Last but not least, a single adjustment ring lets you change the orientation of the camera. You need to raise the center column if you want to orientate it to portrait mode.
You can invert the center column, by taking it out and putting it in from the bottom, and have the camera mount under the tripod head for macro shots close to the ground. You can widen the angle of the legs to get it into a low mode but would need to extend the center column up a little. While these steps are slightly more cumbersome, I thought it was nice to have the option to do so on such a compact tripod.
Extending the legs
These legs feel sturdy, and so do the cam levers. Right out of the box, some of the cam levers might need to be tightened using the included 4mm hex tool, or else the legs will collapse back in even with them locked.
Extra features
I am not exaggerating when I say there are many fresh ideas in this tripod. Tripods have been around for almost as long as cameras have and to dare to innovate them deserves respect.
There is a hook at the bottom that lets you hang your backpack for increased stability. The hook looks pretty small, especially when the handles on most of my backpacks, like the Able Carry Daily Backpack, are thick and padded. But, it felt surprisingly stable.

The hook is removable to reveal a phone mount within the center column. There are magnets within the column to prevent the mount from dropping out which I thought was an amazing attention to detail. I do worry that the hook and mount are small parts that you might easily leave behind.
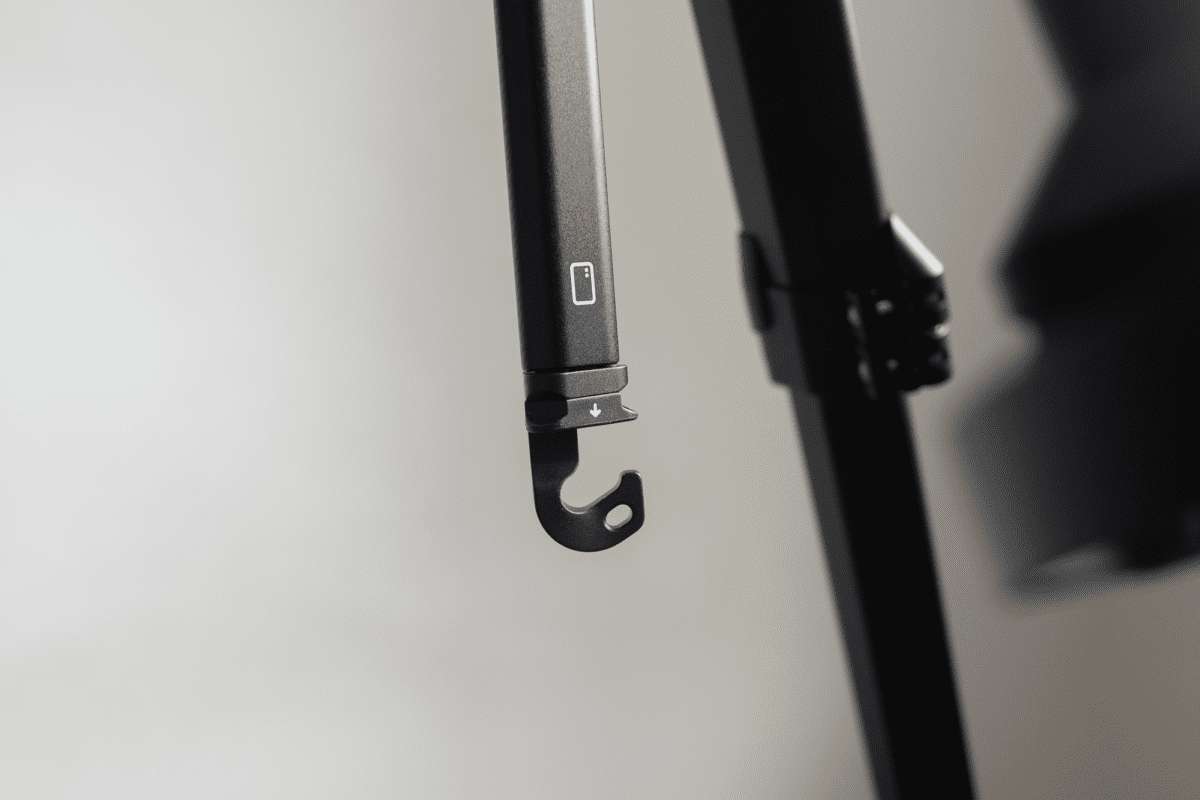
The smartphone mount has a spring mechanism that clasps your phone. It was able to hold my iPhone 13 Pro Max with relative stability, even with a Magsafe handle attached. I love how effortlessly they implemented this feature.
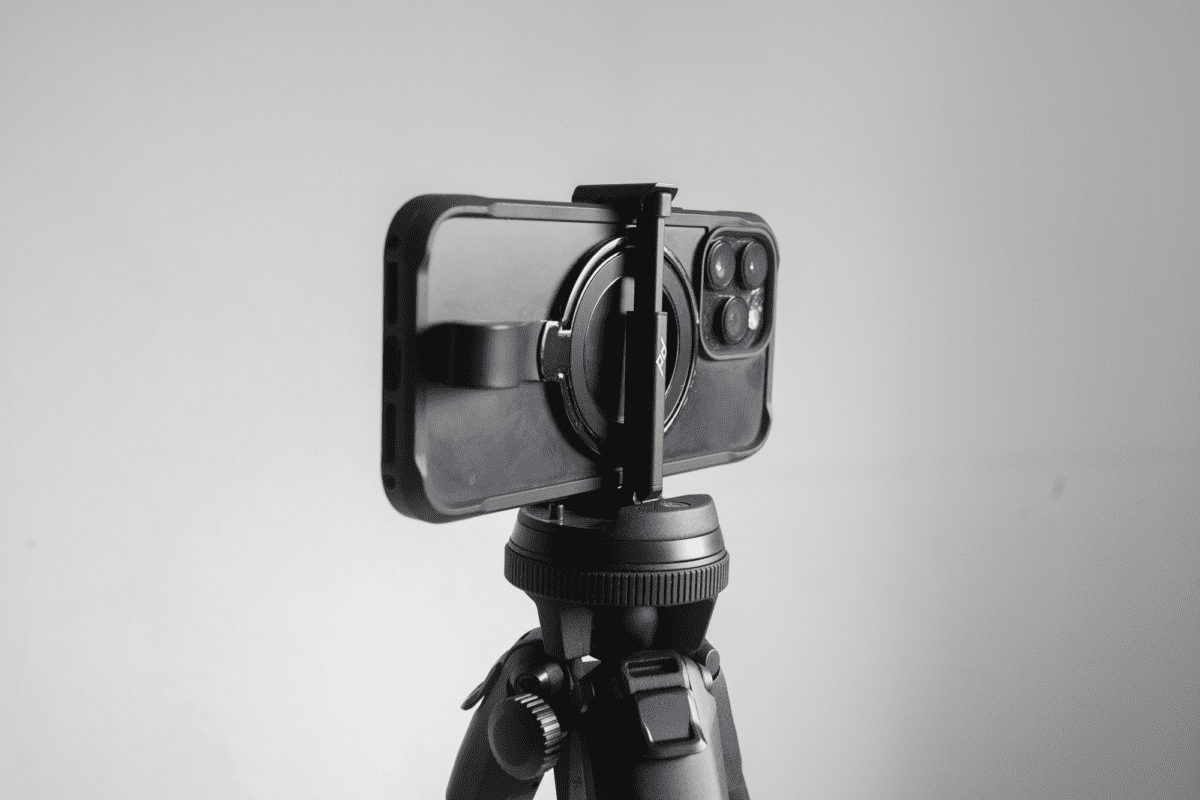
You won't be able to latch onto your phone in a vertical orientation, but instead, need to use the center knob to rotate it. This, of course, is expected and it would be unstable to latch on that way anyway.
As I continue to travel and use the tripod, do check back more.
5-month update
I've been pretty impressed by the weight of the tripod. I've brought it out for full days of city exploration and it didn't wear me down at all.
The main thing that irritates me now and then is how the hex tool and the mount that holds it falls off easily at times, like when it catches the opening as you pull it out of the cover.
Conclusion
To wrap up, the Peak Design tripod stands out as a top-tier option in the realm of travel tripods. Its seamless blend of portability, versatility, and durability makes it an enticing choice for photographers and adventurers.
While its premium price tag may give some pause, the investment is justified by the innovative design features and high-quality materials. Despite minor usability concerns on the extra features, the overall experience of using the Peak Design tripod is commendable and won't disappoint.
Like this review? See all of my in-depth reviews.
Also, consider supporting me by being a Patreon. Every cent given will go back into improving the content of this website.
Tagged aluminum camera peak design review tripod