This website is made possible by readers. I may earn a small commission when you buy through the links in this article at no extra cost to you. Learn more.
Details
- Price $31.95 pre-order on Amazon
Overview
Aeropress (then known as Aerobie), founded in 1984 by renowned inventor and retired Stanford University engineering instructor, Alan Adler, begun as a company to manufacture and sell revolutionary sporting goods inventions. It wasn't until 2004, that he began studying the coffee brewing process and in 2005, the legendary AeroPress coffee maker debuted and took the world by storm.
It was only in 2017, that they sold off their sporting goods arm, to concentrate on the AeroPress, thereby renaming the company to AeroPress. With this new focus in just their coffee makers, the AeroPress Go was created as an answer to coffee-lovers who wanted something they could bring along. Well, coffee lovers like me.
I love coffee. But I’m not addicted enough to have my “fix” every morning or bring along a coffee maker like the Bialetti Moka Express during travel. I'm too much of a scrooge when it comes to the space in my backpack.
But the Aeropress Go certainly got my attention. A coffee maker made for travel is just too hard to resist. It’s the idea that with it, you can have coffee anywhere there is hot water.
I brought this on a trip to Danang, Vietnam to see if this is worth the space in my one bag.
Style
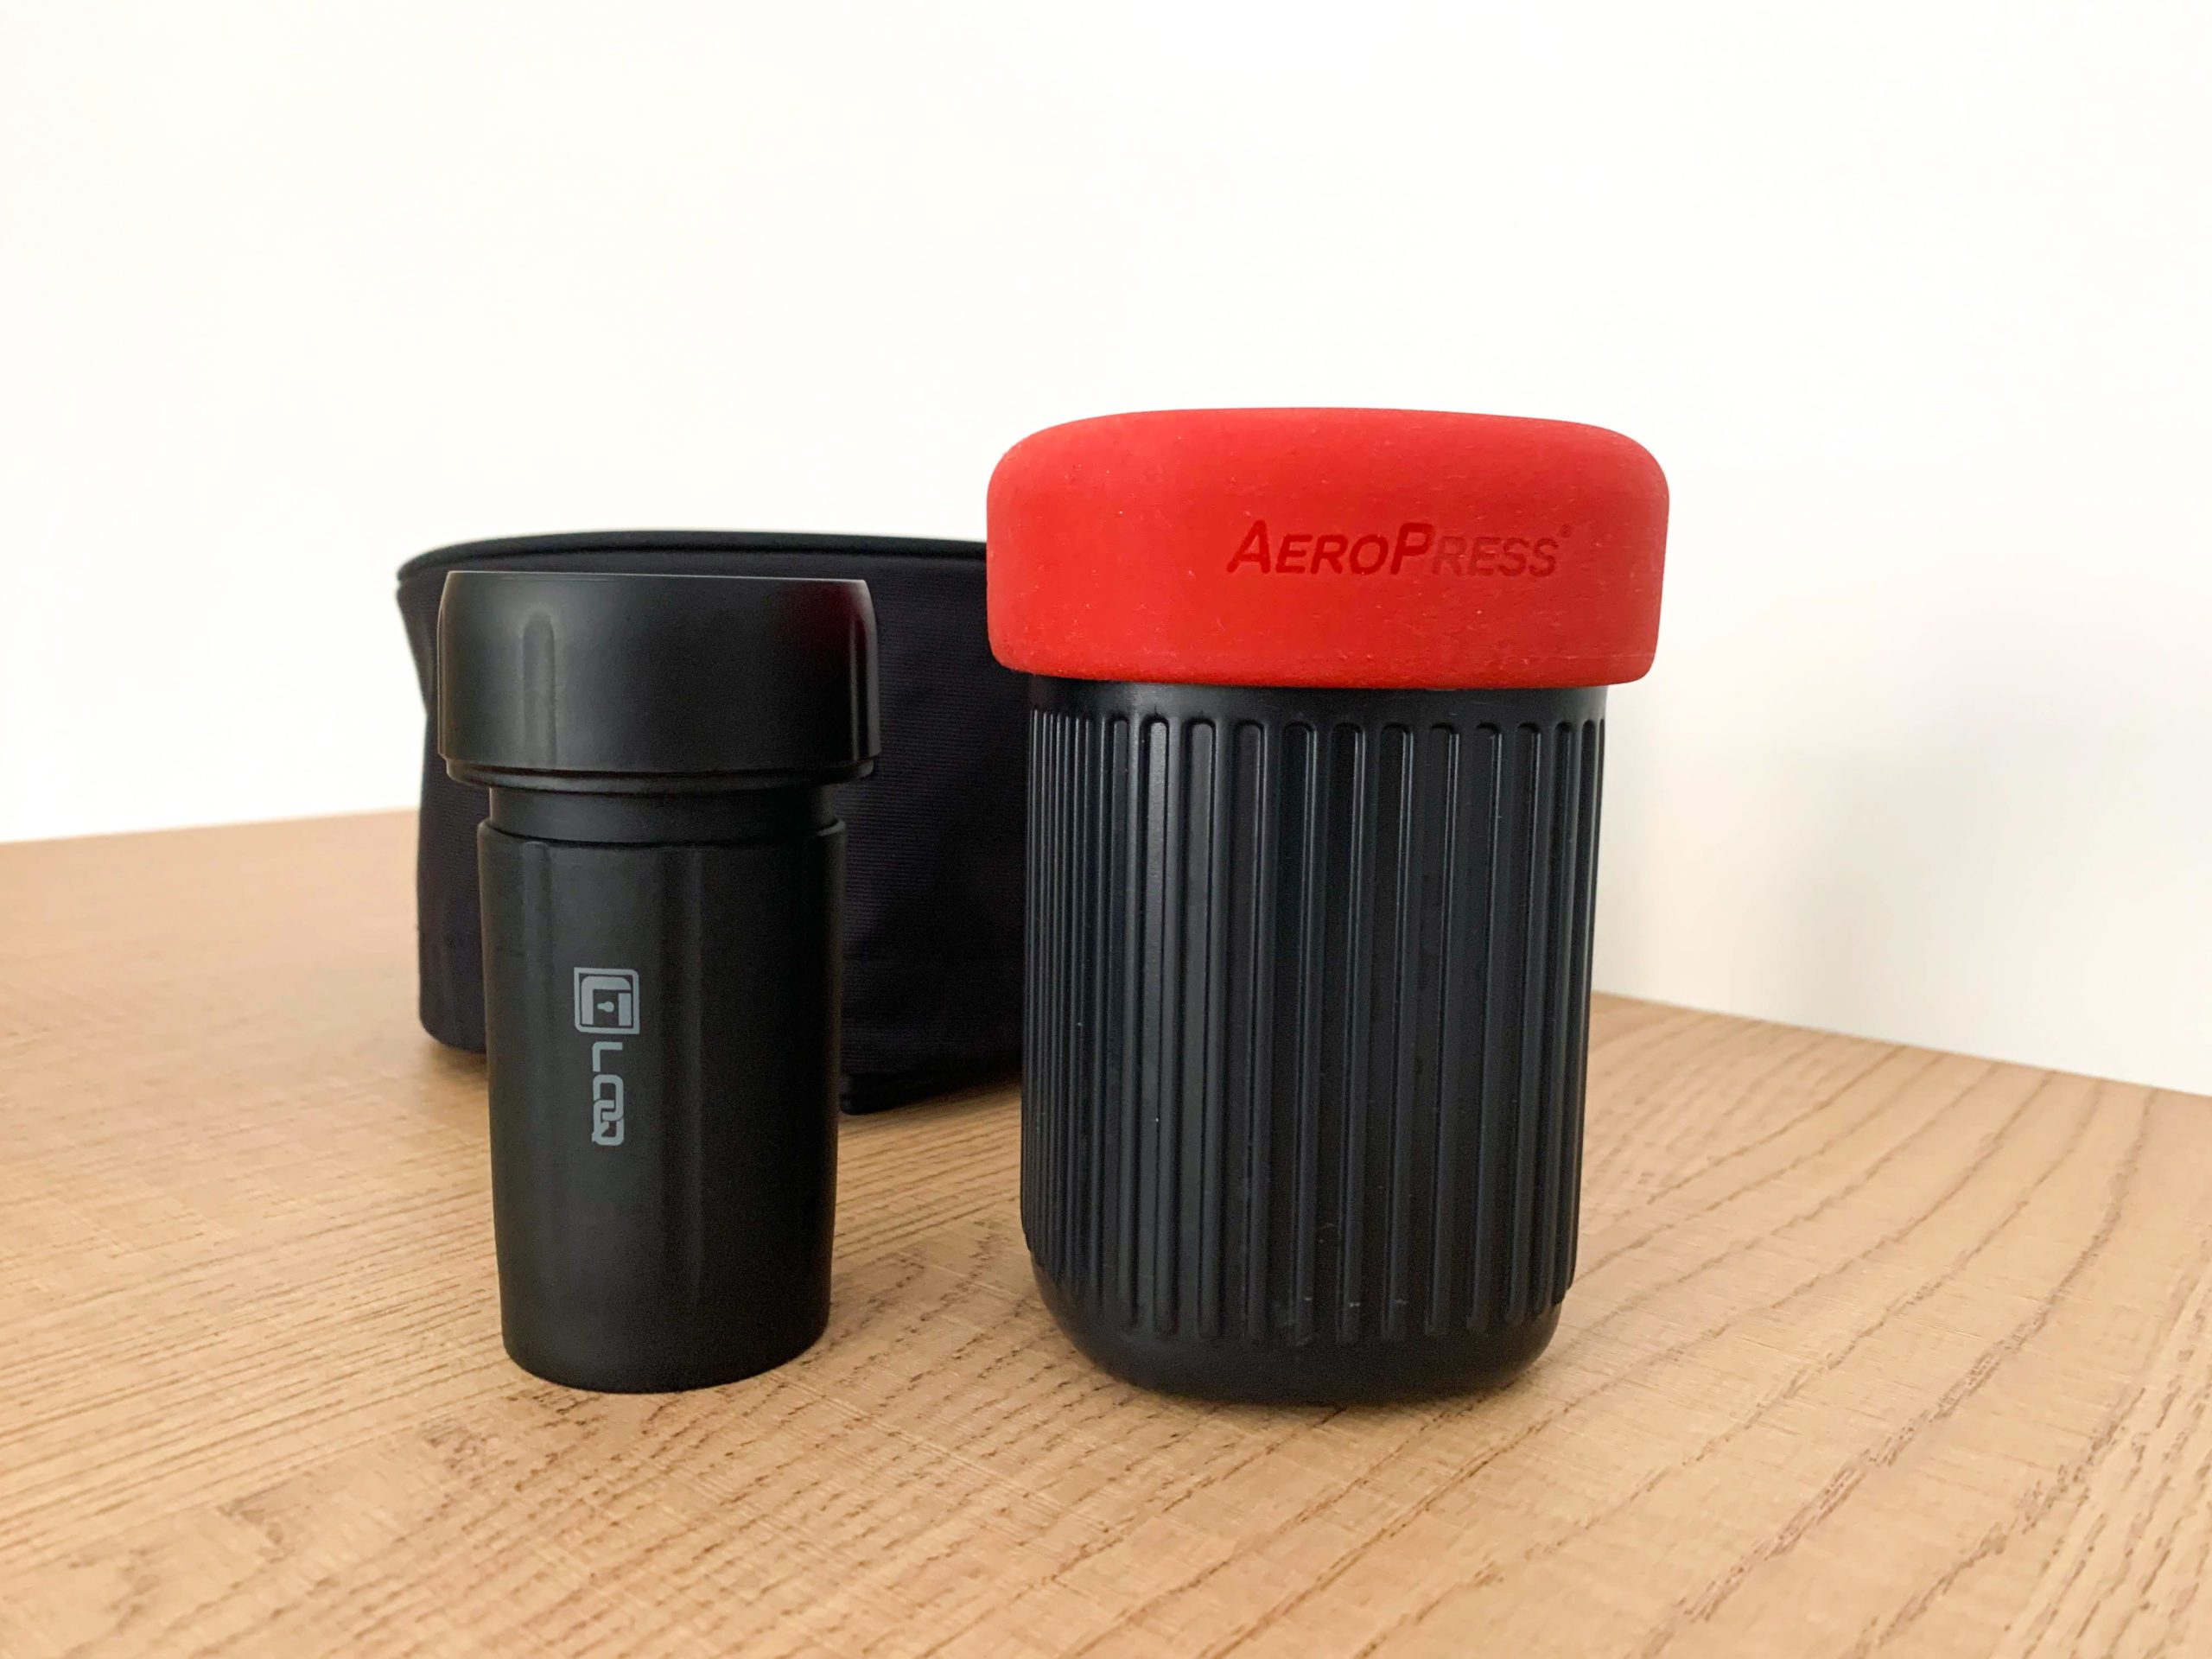
There is only one size and color that it comes in. The size is meant to be compact, with extras like the mixer and scoop kept within the Aeropress Go itself.
It’s a dark charcoal color with a red cap rubber to cover when not in use. While I'm always one for an all-black colorway, I can see the red cap being an iconic part of an already iconic brand.
Unlike the gold-foil lettering on the regular Aeropress which are meant to identify original Aeropress from counterfeit ones easier, the letterings on the chamber are in red, probably to keep consistent with the color of the cap. The chamber is in a grey tint so that you can see the water level through it.
On the chamber, there is an Aeropress logo and three circular marked, labeled 1, 2 and 3, for you to gauge the water level. I'm not sure why they chose to use circles instead of a line for accuracy, but I guess it's not a big deal. Baristas won't being using this for the coffee-making world championships anyway.
Material
Like the original Aeropress, the Aeropress Go is made from BPA-free polypropylene.
This used to be an ad.
But no one likes ads, so I got rid of them. If my articles helped you, I ask for your support so I can continue to provide unbiased reviews and recommendations. Every cent donated through Patreon will go into improving the quality of this site.
The seal on the end of the plunger is made of silicone, which is frequently used in kitchen tools because of the non-toxicity and excellent durability, as well as a resistance to heat.
Usage
The usage is really the biggest factor for me when deciding on the AeroPress Go. It's designed for travel, but does it really work?
I took it on a two-week-long trip to Danang, Vietnam and here are my thoughts.
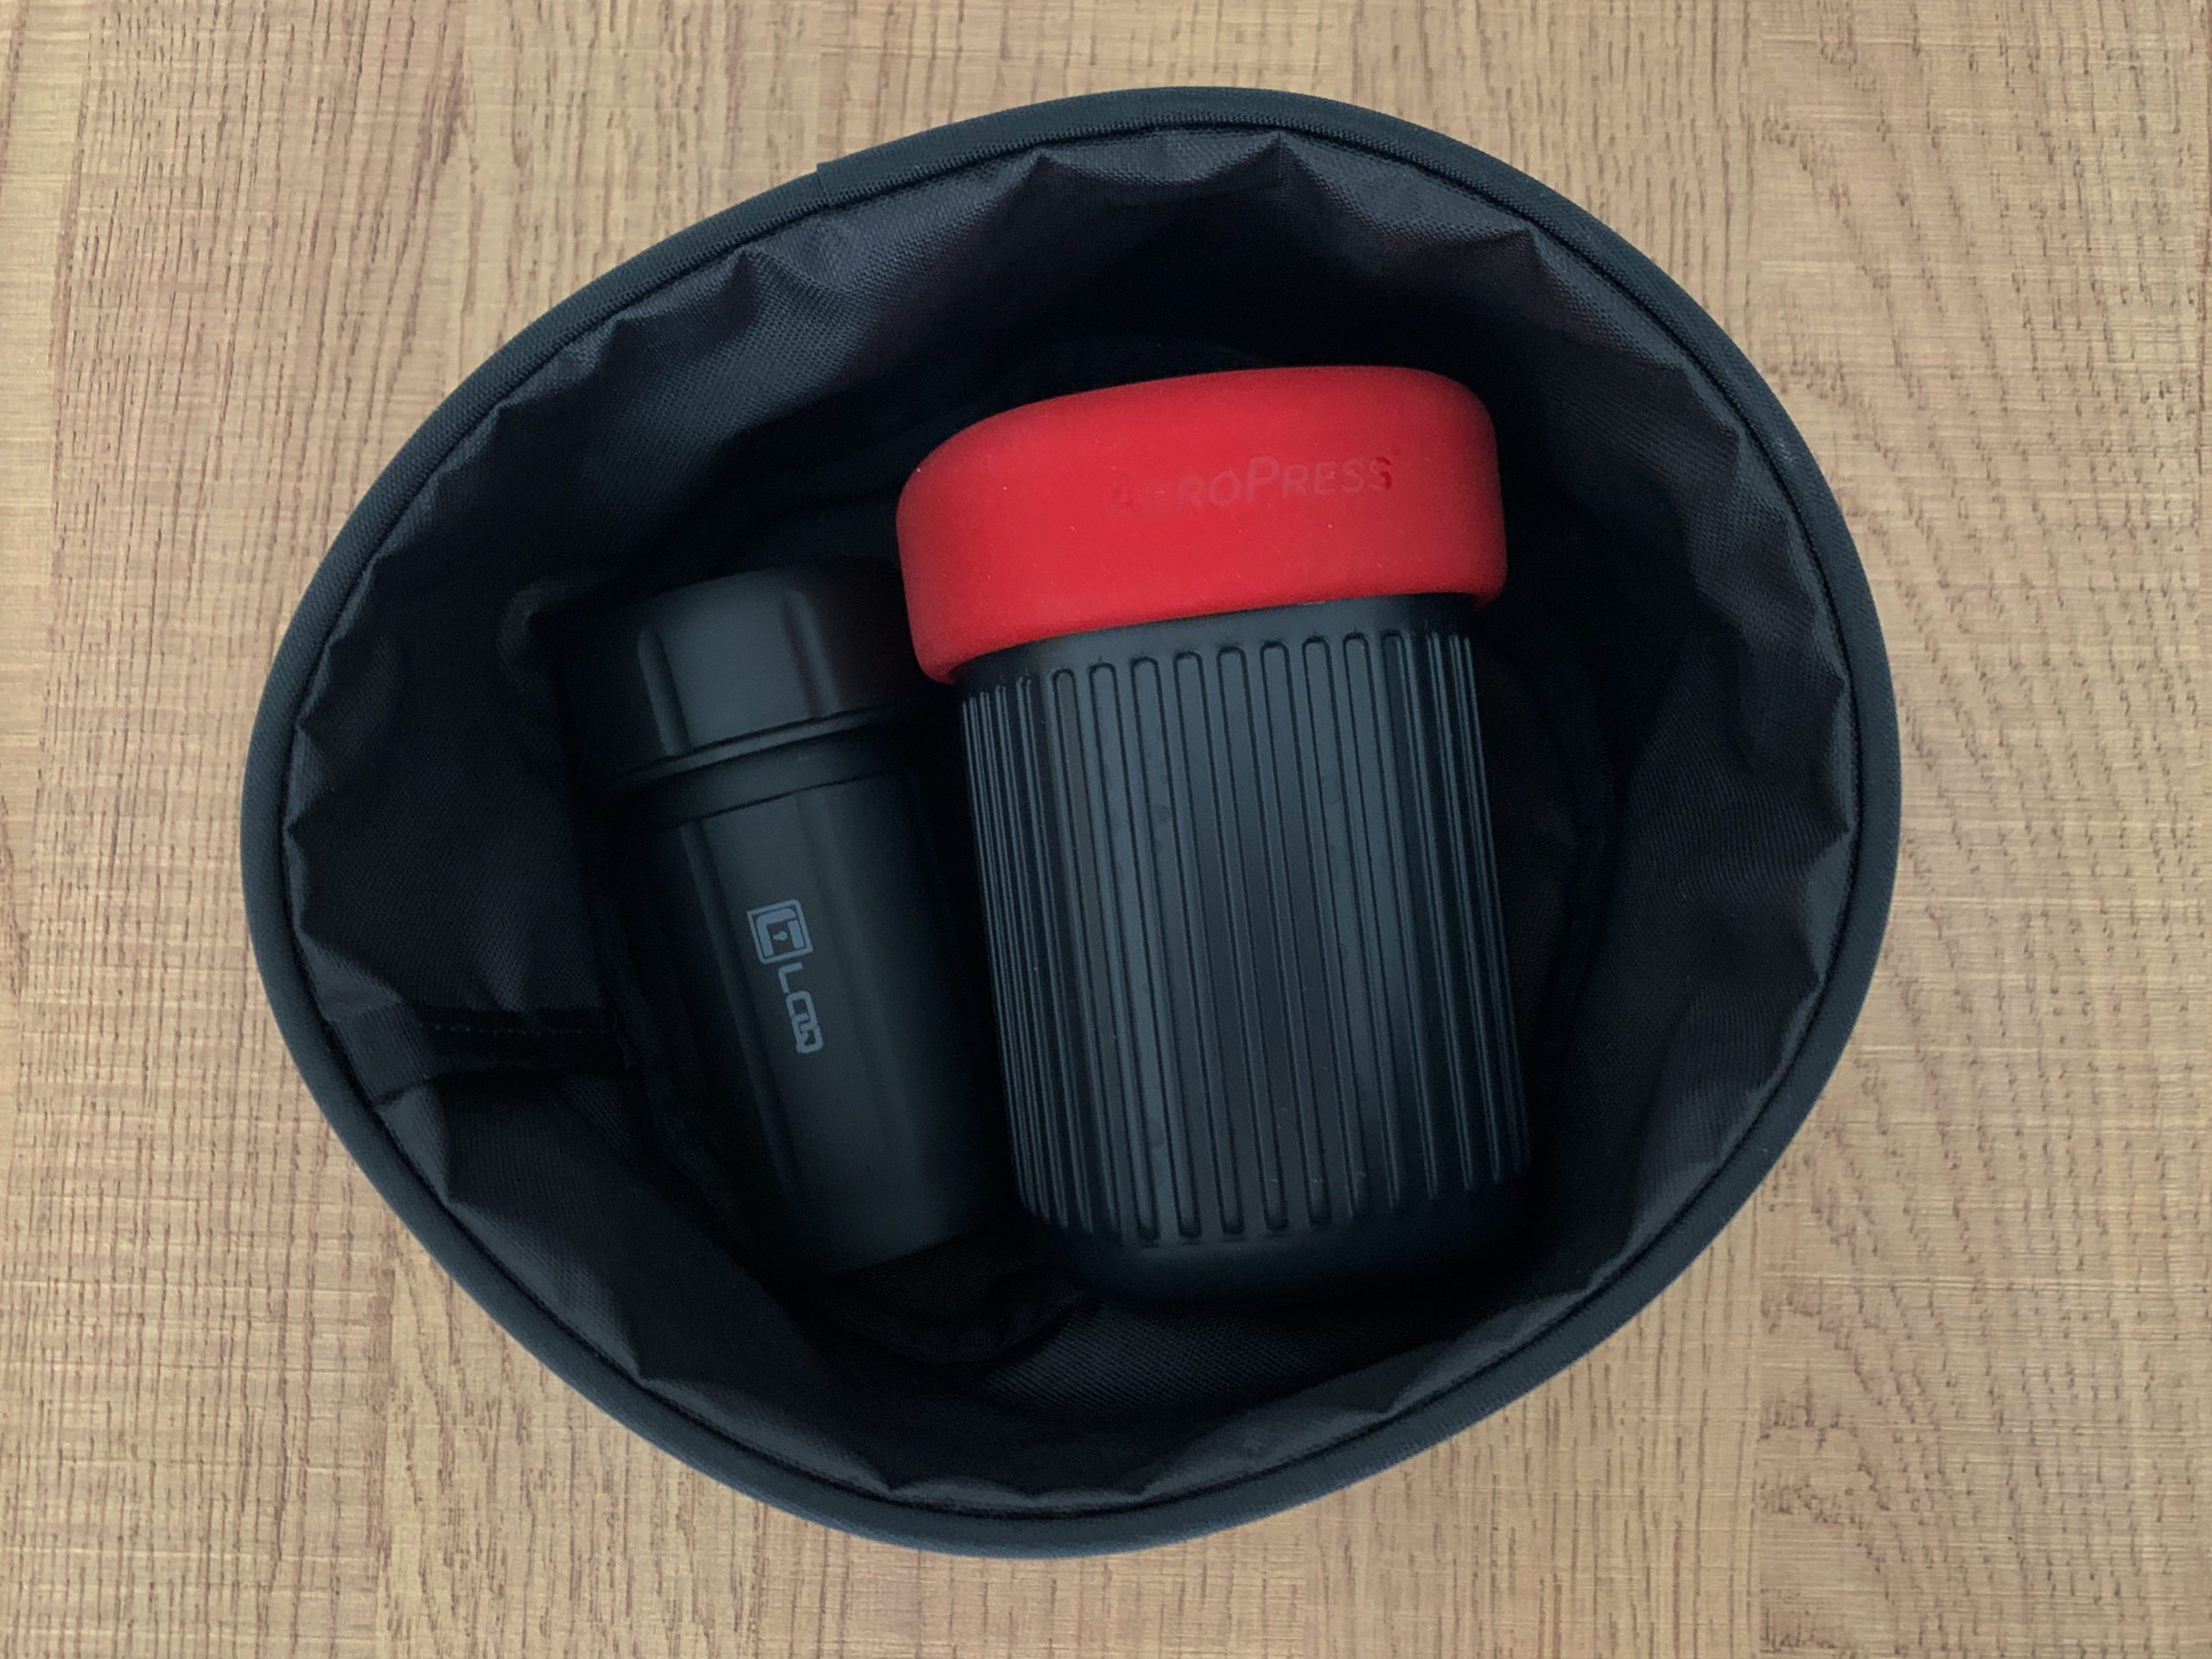
Packability
The AeroPress Go certain comes in a very travel-friendly package. Everything packs down, daruma doll style, into a simple package.
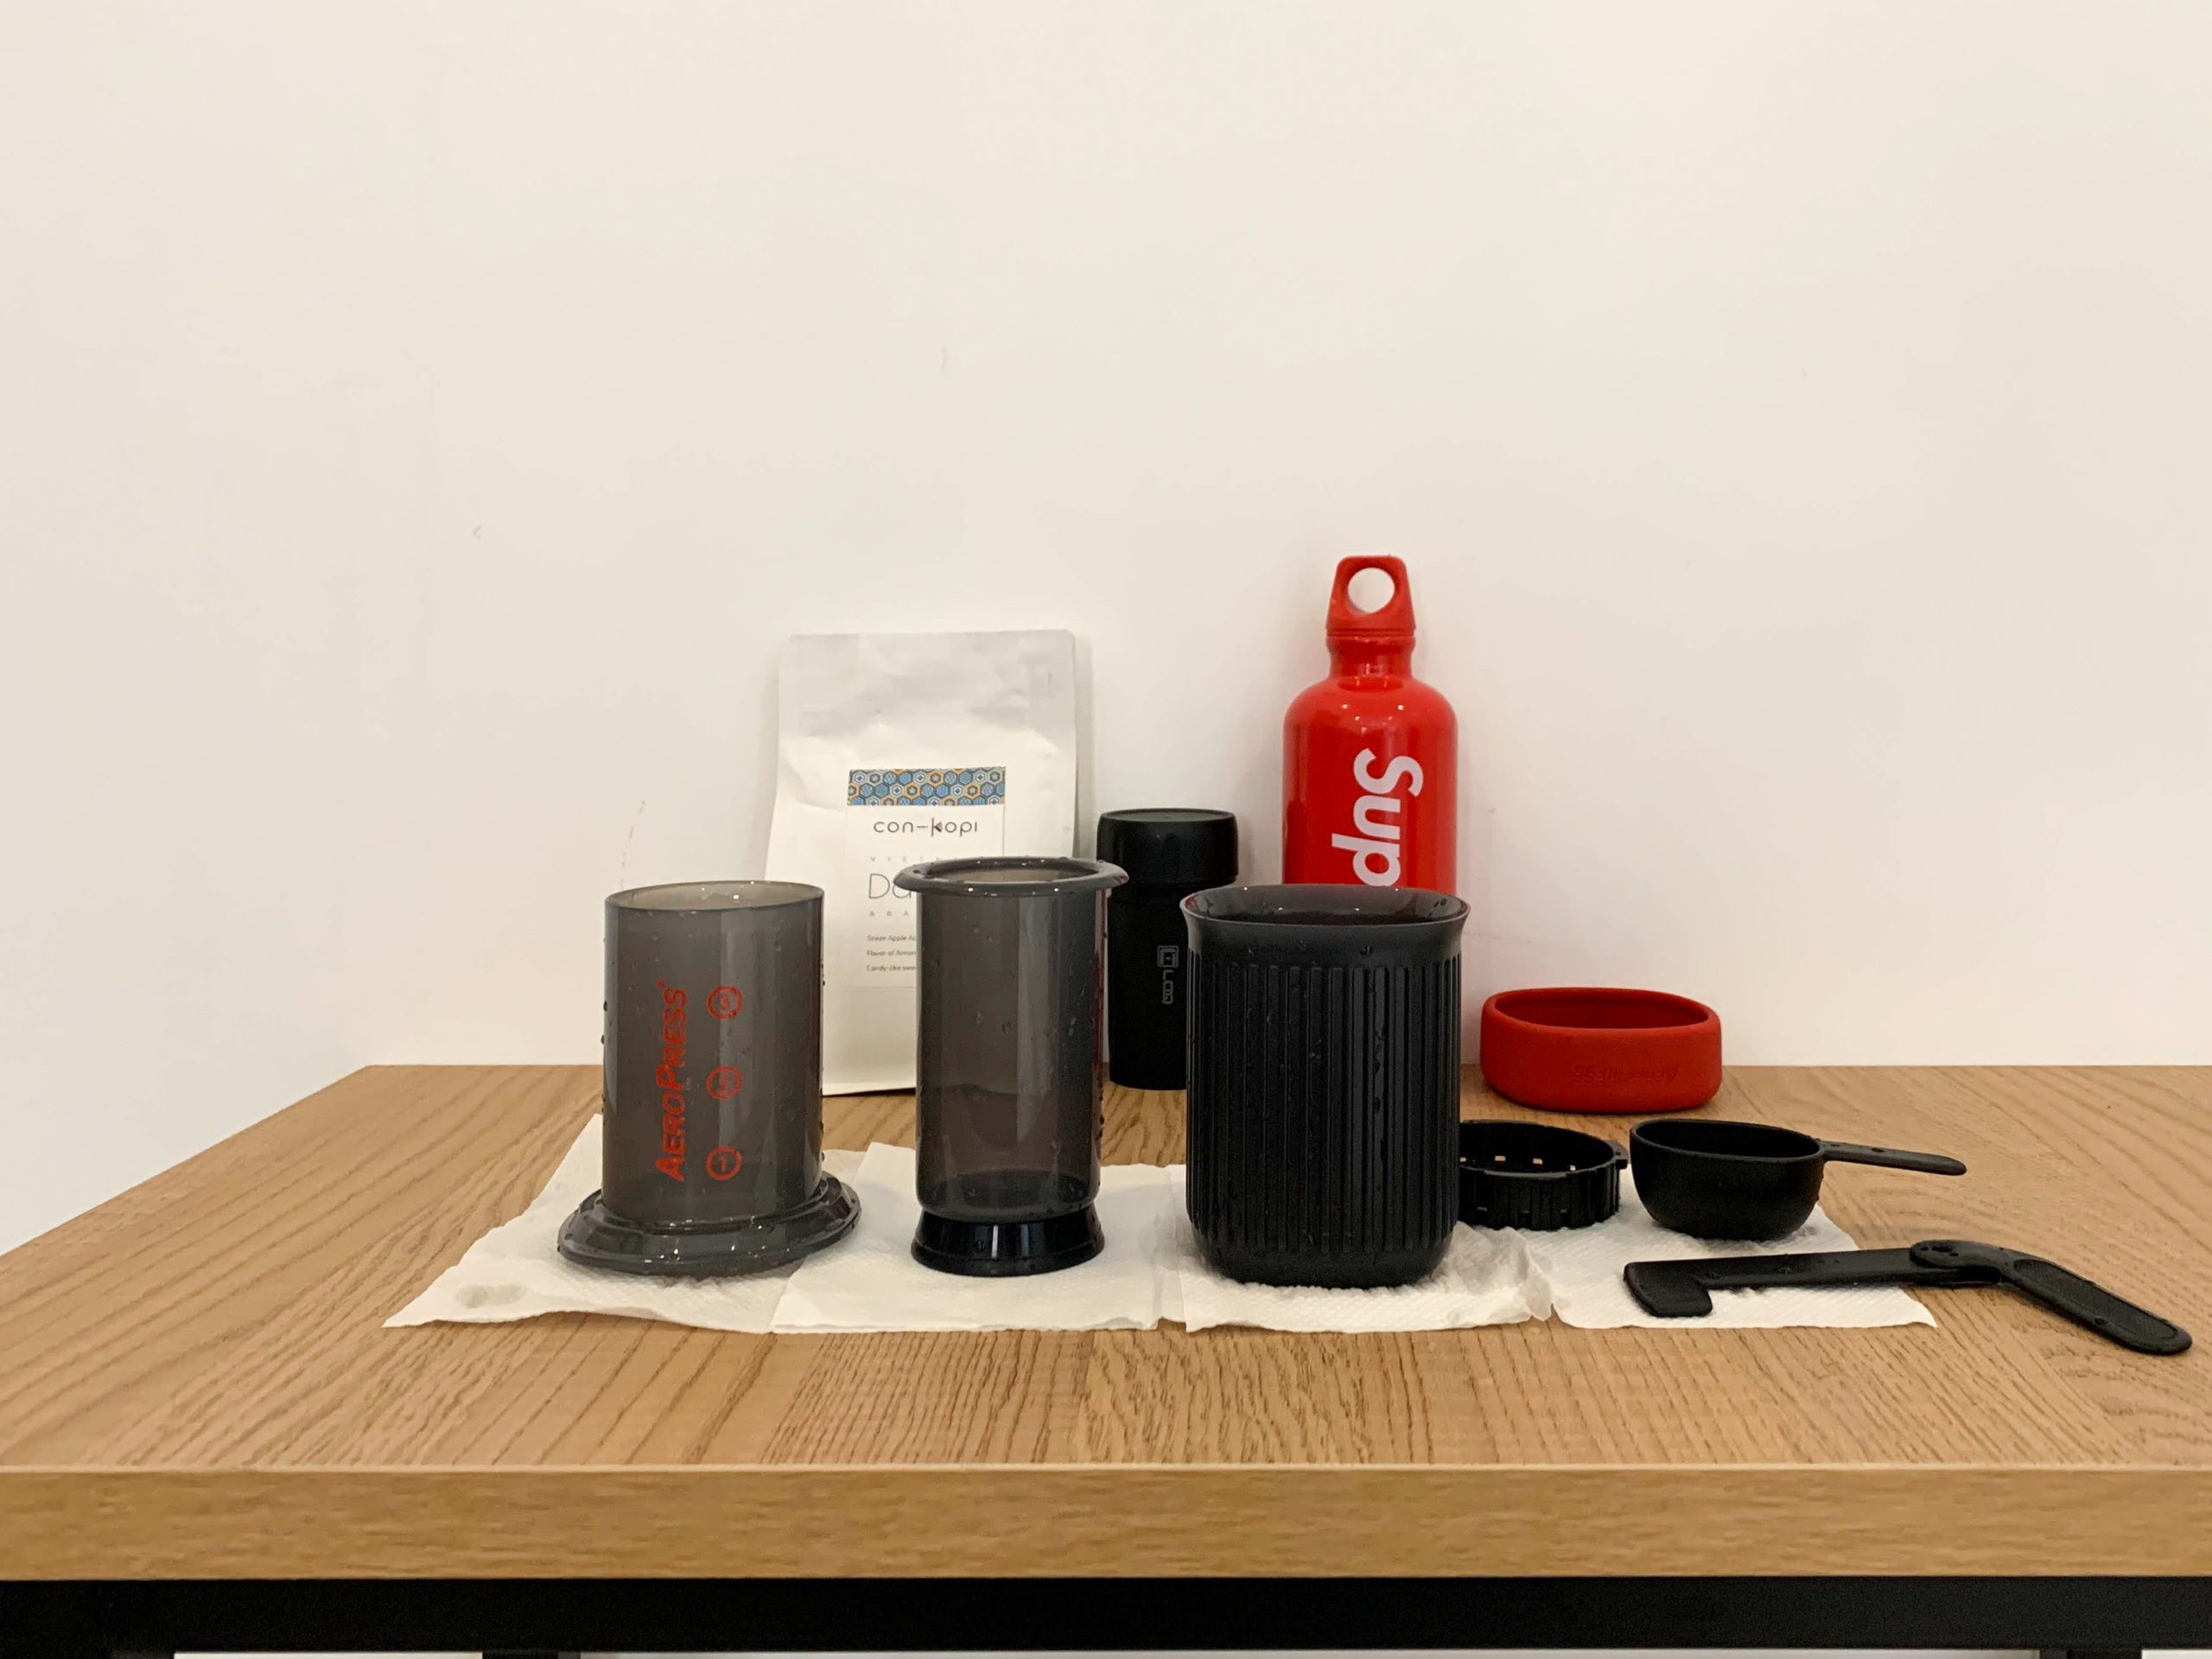
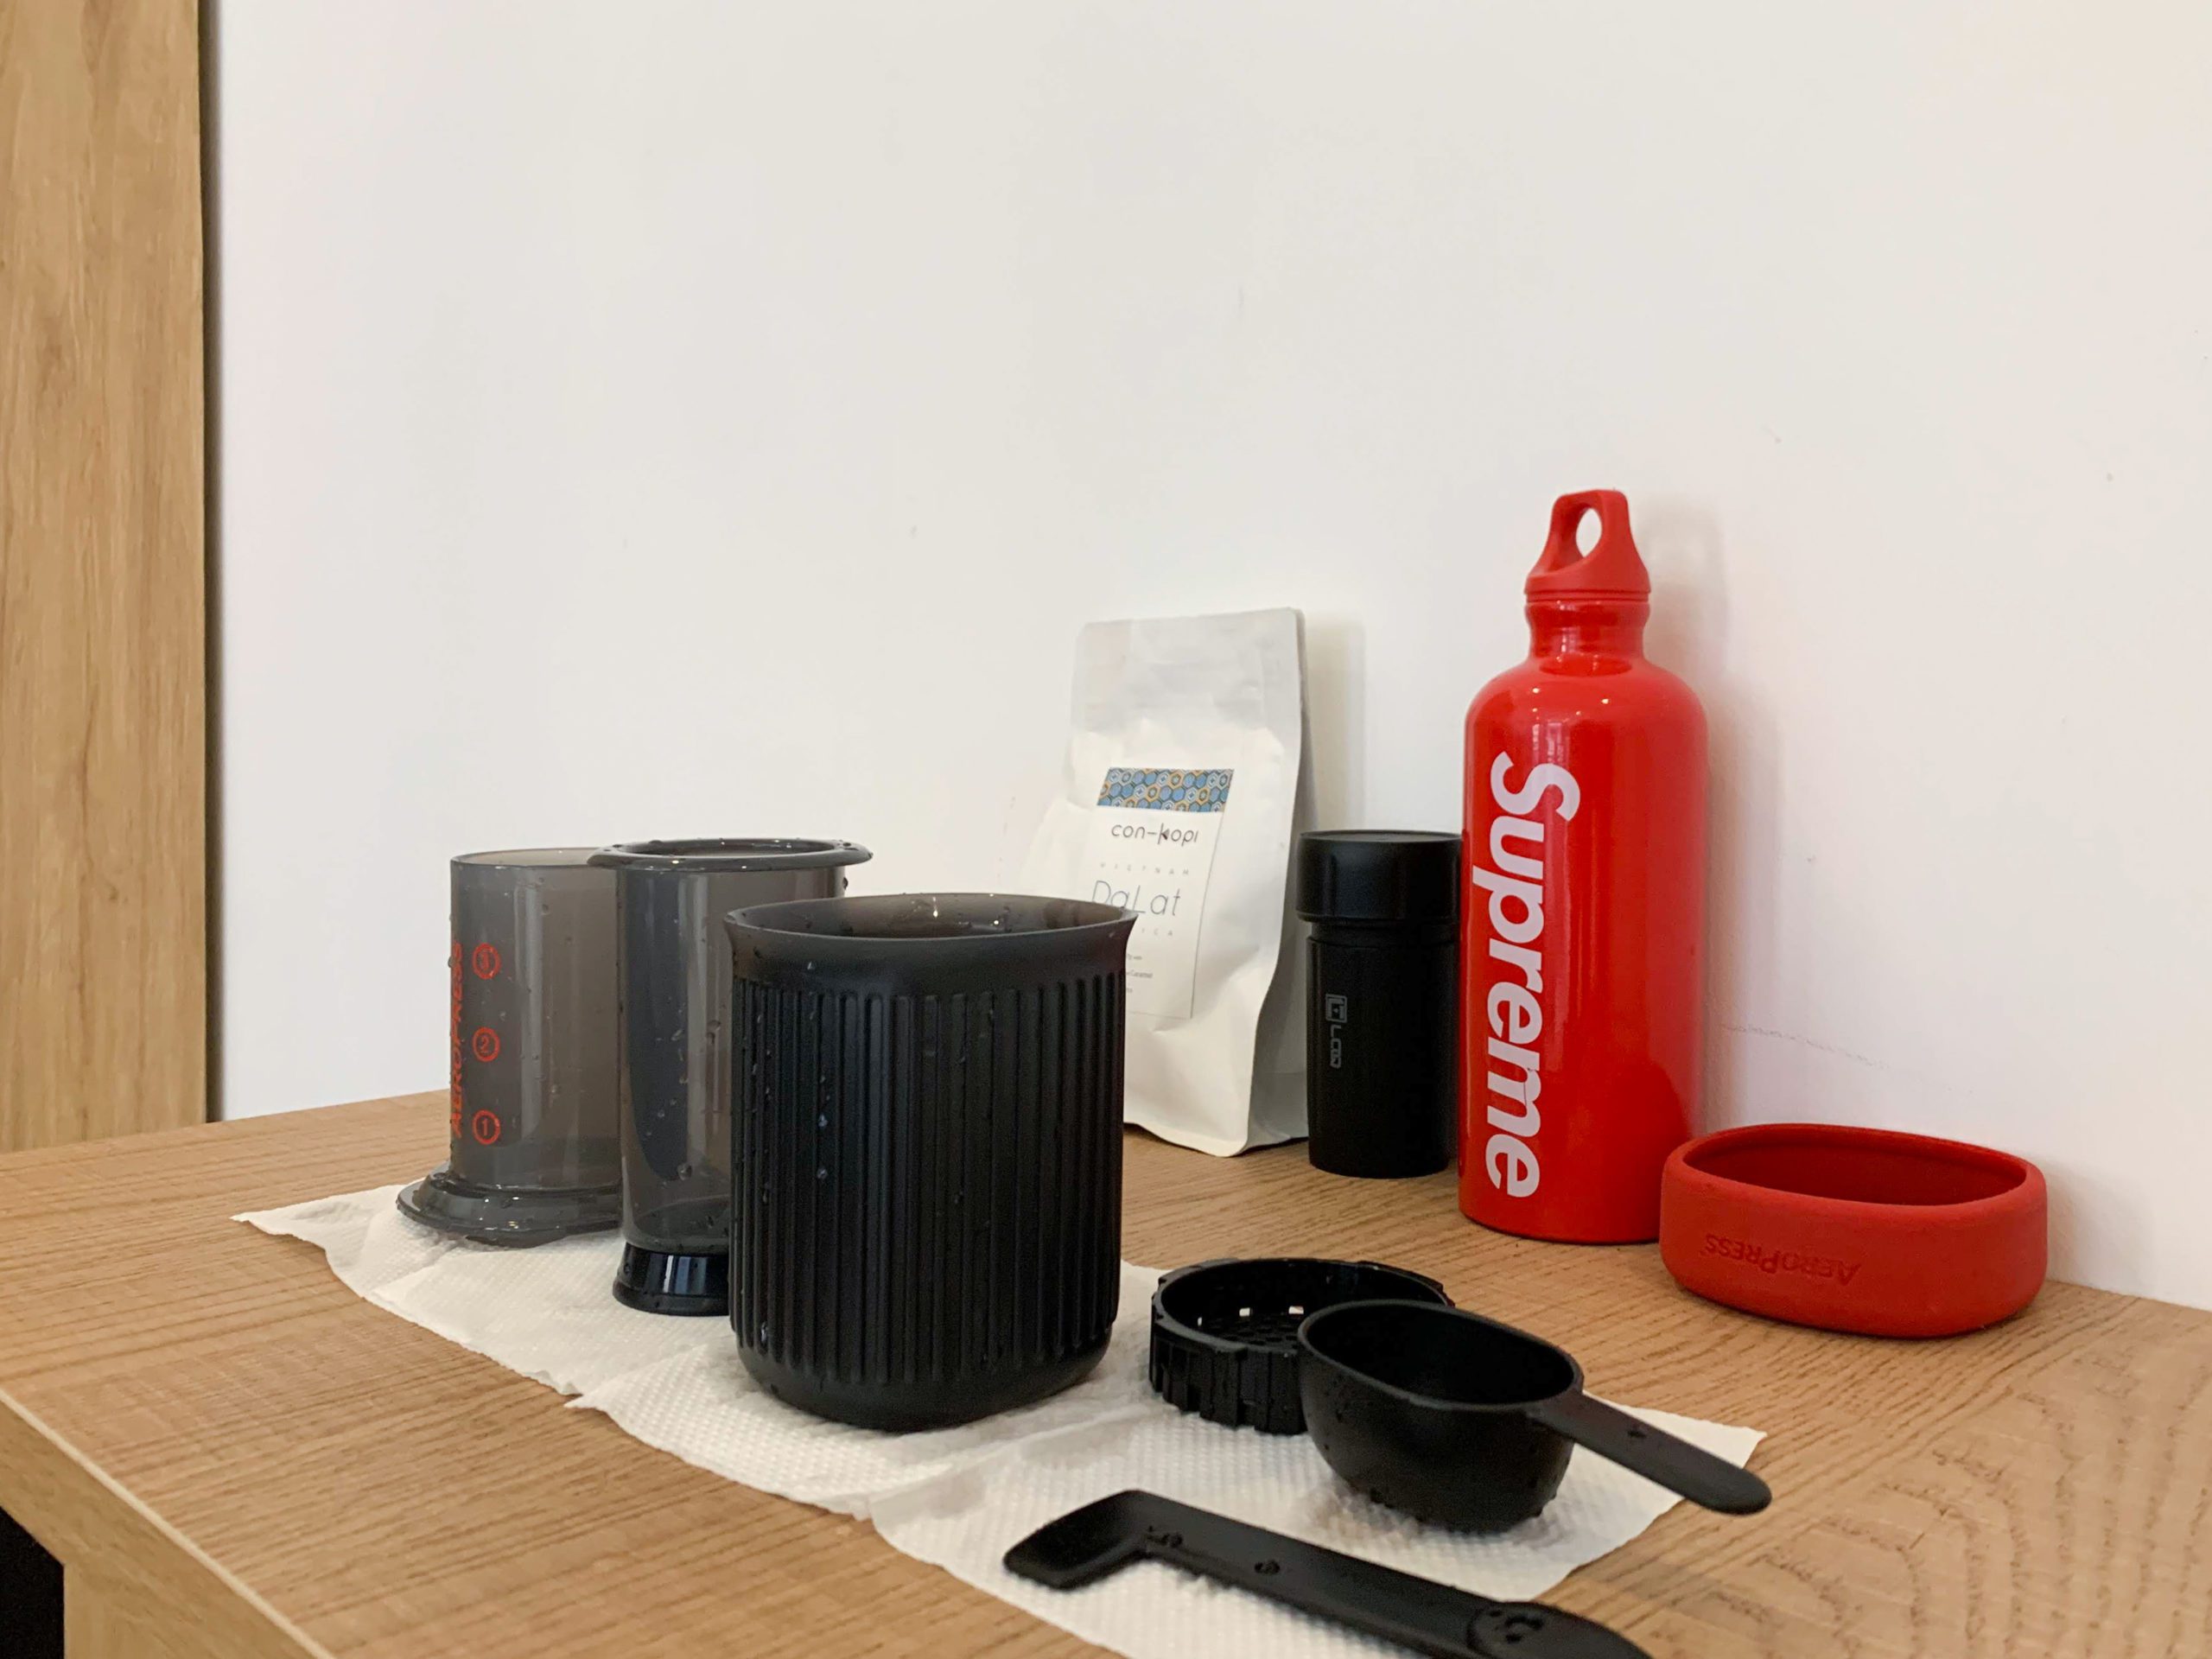
The AeroPress Go comes included with the following parts
- Plunger
- Chamber
- Filter Cap
- Stirrer
- Filter holder
- Scoop
- Lid
- Mug
- 350 pieces of filters
To keep it all together the stirrer and scoop go into the plunger, which goes into the chamber. The filter cap is screwed onto the chamber. And that goes into the mug with the filter cap facing up. Place the filter holder on top and cover it with the lid.
While it comes with 350 filters, you can only carry up to 20 filters in the filter holder. I've managed to squeeze in 21 filters, which is the tipping point as the holder won't stay close with more.
I found the way that the different parts can be kept into a tiny package pretty amazing and it is definitely packable.
I designed a thing.
I found a 100 year old company that would create these heirloom quality canisters for me. They are handmade and will keep your tea leaves, coffee beans or anything that you need dry for years to come.
or read review
You want to note that apart from hot water, you also need coffee beans which is another thing you have to bring along. They need to be grounded beans if you don't want to bring along a portable grinder. On this trip, I brought along a Canniloq storage container and was planning to get some beans from Danang, since I've heard it's well-known for locally grown coffee beans.
I stored the AeroPress Go and Canniloq storage container in my TOM BIHN Travel Tray and was on my way.
Brewing
Brewing coffee was also simple enough.
- Put a filter in the filter cap and screw it onto the chamber.
- Add a scoop of grounded coffee beans into the chamber.
- While chamber is positioned above the mug, add 175°F or 80°C hot water (or room temperature for a cold brew)
- Stir 10s for hot brew or 1 minute for cold brew.
- Push plunger down till you feel pressure.
The result should be a single shot of espresso, which you can
- Drink as it is.
- Add water to make 237ml cup of coffee (about half the mug)
- Add milk to make 237ml cup of coffee (about half the mug)
- Add room temperature or ice water to make 237ml cup of cold brew coffee (about half the mug)
During my trip, I didn't have a kitchen attached to my Airbnb so I had to bring down drinking my kit to the shared kitchen. The bare minimum you need in this situation is the mug and the chamber with filter and filter cap attached.
What I did was just fill the mug up with drinking water and brought it down. Boiled that water and pour it into the chamber when hot. Then, you could just bring that hold setup back to the room to complete the brewing.
Taste
I usually make my coffee pour-over style, and I've noticed that a whole scoop of coffee beans for 237ml of coffee seems like pretty poor beans to coffee ratio. I'm usually able to make two cups of coffee with that amount of beans.
I've also found that compared to pour-over coffee, the taste is a little weaker. This is especially so with the cold brew, with the end result coming out watery, once again, as compared to pour-over coffee. This was a little depressing for a cold brew lover like me, who didn't have previous experience with AeroPress.
Instead of adding water to the resulting espresso shot, I like to pour it through the chamber to go through the beans, for a stronger coffee taste. I also leave the water in the chamber to soak up flavor from the beans as long as I can. There also seems to be quite a bit of coffee sediments in the mug, which some might not like.
Cleaning
After you finish brewing, you probably want to drink it before you clean up. Since you would have to wash the mug after cleaning anyway. This means that you have to put the stained parts somewhere while you finish your drink.
You get rid of the used coffee beans by removing the filter cap and pushing the plunger further to put the coffee beans out. In this step, you'll find, that most of the time, remenants of the wet, expanded coffee bean would be found on the plunger. What I do is that I push the plunger through, but not all the way down that it comes in contact with the grounded coffee. I've found that the air pressure itself was enough to push out all the grounded coffee.
I didn't have a kitchen attached to the Airbnb room I was staying in, so I had to wipe it off before I was able to rinse it since I didn't want to clog up the bathroom sink.
In my case, I laid out some tissue paper on the table and left it there till I was done drinking. It's not a problem, but if anything, it was just a little bit of an eyesore.
When washing it, it's hard to see if it's properly cleaned given the greyish material, but I usually just rinse it till the water turns clear. So if you have to be on the move right after for coffee, chances are that you would want to pat them dry before keeping it.
Conclusion
Before the Aeropress Go, I wasn't regularly making coffee even when not traveling. But I find myself looking forward to the first cup of coffee to start my day on my Danang trip, sometimes even indulging in two cups. It felt easy to do since it took almost no time to make one and that I didn't pack it up between uses to let it air dry.
While you are not going to get the same quality of coffee as you can at hold with all the non-portable tools at your disposable, the Aeropress Go is fantastic if you absolutely need coffee on the go.
A travel coffee maker is a good tool to help you save money, but since I brought it with me to Vietnam where coffee is less than $1, I wonder if it was worth the trouble and space taken up.
Like this review? See all of my in-depth reviews.
Also, consider supporting me by being a Patreon. Every cent given will go back into improving the content of this website.